How To Use Clareblend Mini Microcurrent Device
How To Use Clareblend Mini Microcurrent Device
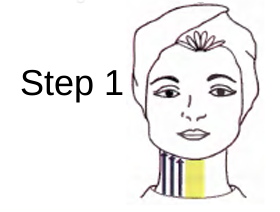
Step 1: Cleanse the entire face and neck area. Apply a thin layer of conductive gel to one side of the neck & jaw line. Touch electrodes to the skin at the base of the neck & wait for a single beep. SLOWLY glide upward toward jaw line. Maintain electrode contact with the skin during movement & HOLD at the end of the movement until a double beep is heard. Move to the next section & repeat 3 times as shown. Avoid thyroid and the center area of the neck as indicated as a rectangle on the diagram.
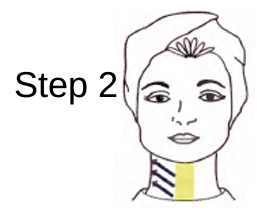
tep 2: Position MINI near the center of the neck and touch the electrodes to the skin. Wait for a single beep, then move the device SLOWLY toward the side of the neck. At end of movement, HOLD until a double beep is heard. Repeat movements as shown, each section of the neck 3 times. Avoid thyroid and the center area of the neck as indicated in rectangle on the diagram.
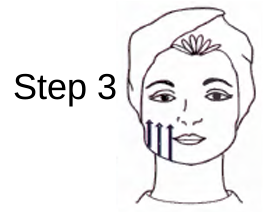
Step 3: Apply a thin layer of conductive gel to the jawline and cheek area. Position MINI at the jaw line and touch both electrodes to the skin. SLOWLY glide the MINI up and under the cheek bone. HOLD at end of movement until a double beep is heard. Repeat steps 3 times. Move to the opposite side of face and repeat jaw line steps 3 times.
Step 4: Touch electrodes to the skin near the jaw line and SLOWLY glide across the skin toward the side of the face. working Apply a thin layer of conductive gel to the jawline and cheek area. Position MINI at the jaw line and touch both electrodes to the skin. SLOWLY glide the MINI up and under the cheek bone. HOLD at end of movement until a double beep is heard. Repeat steps 3 times. Move to the opposite side of face and repeat jaw line steps 3 times. Step 3 Bottom movement follows the jaw line with one electrode above & one electrode below the jaw line. Maintain contact with the skin and HOLD at the end of the movement until a double beep is heard. Move to the next section as shown by the diagram by arrows and repeat until each movement has been completed 3 times.

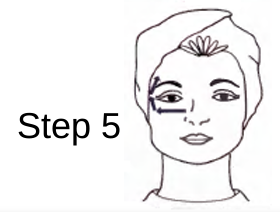
Step 5: Carefully apply conductive gel around the eye, temple and brow area. Touch electrodes to the skin near the nose waiting for a single beep before moving MINI toward the ear, continue movement gliding upward treating crows feet area. At the end of the movement HOLD until a double beep is heard. Repeat 2 more times, and repeat steps on opposite side of face.
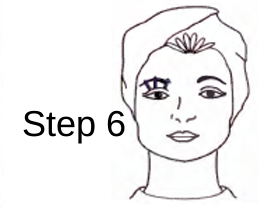
Step 6: Touch electrodes to the skin at the base of the brow bone. Wait for a single beep, then lift at the brow and HOLD until a double beep is heard. Repeat three times in each section as arrows show on the diagram. All eye movements should be on the orbital bone (never on the eyelid). Carefully reapply.
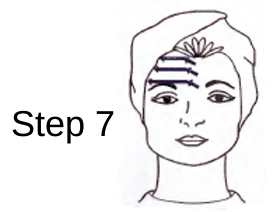
Step 7: Apply conductive gel to one half of the forehead. Touch electrodes to the skin between the brows and wait for a single beep. Begin SLOW movement between the brows, moving up and over brow toward the side of the forehead. HOLD at the end of the movement until a double beep is heard. Movements for each half of forehead should completed 3 times.
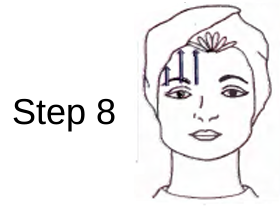
Step 8: Starting at the top of the brow wait for single beep. Begin movement at the top of the brow and glide up toward the hairline. HOLD at end of the movement until a double beep is heard. Complete each movement 3 times. Repeat steps on opposite side repeating 3 times. When finished with all movements wipe face with damp cloth if needed. Unplug MINI, clean electrodes with damp cloth & store in safe place.
Visit Clareblend Mini Microcurrent Facial Device Specs and Reviews for more product information.
Recent Posts
-
Best Face Wash for Sensitive Skin
My Journey to Finding the Best Face Wash for Sensitive Skin If you’re reading this, you probab …Apr 22nd 2025 -
Best Under-Eye Bags Cream and Treatment
Best Under-Eye Bags Cream and Treatment Do you have the dreaded under-eye bags that make you look l …Apr 14th 2025 -
Rice Water for Skin Benefits
Rice Water for Skin Benefits Rice water for skin has become a viral beauty trend that is supposed t …Apr 4th 2025

